Saturday, November 2, 2013

SOFTWARE TESTING

0 comments

What is testing?

Testing is the process of evaluating a system or its component(s) with the intent to find that whether it satisfies the specified requirements or not. This activity results in the actual, expected and difference between their results. In simple words testing is executing a system in order to identify any gaps, errors or missing requirements in contrary to the actual desire or requirements.
According to ANSI/IEEE 1059 standard, Testing can be defined as A process of analyzing a software item to detect the differences between existing and required conditions (that is defects/errors/bugs) and to evaluate the features of the software item.

Who does testing?

It depends on the process and the associated stakeholders of the project(s). In the IT industry, large companies have a team with responsibilities to evaluate the developed software in the context of the given requirements. Moreover, developers also conduct testing which is called Unit Testing. In most cases, following professionals are involved in testing of a system within their respective capacities:
  • Software Tester
  • Software Developer
  • Project Lead/Manager
  • End User
Different companies have difference designations for people who test the software on the basis of their experience and knowledge such as Software Tester, Software Quality Assurance Engineer, and QA Analyst etc.
It is not possible to test the software at any time during its cycle. The next two sections state when testing should be started and when to end it during the SDLC.

When to Start Testing?

An early start to testing reduces the cost, time to rework and error free software that is delivered to the client. However in Software Development Life Cycle (SDLC) testing can be started from the Requirements Gathering phase and lasts till the deployment of the software. However it also depends on the development model that is being used. For example in Water fall model formal testing is conducted in the Testing phase, but in incremental model, testing is performed at the end of every increment/iteration and at the end the whole application is tested.
Testing is done in different forms at every phase of SDLC like during Requirement gathering phase, the analysis and verifications of requirements are also considered testing. Reviewing the design in the design phase with intent to improve the design is also considered as testing. Testing performed by a developer on completion of the code is also categorized as Unit type of testing.

When to Stop Testing?

Unlike when to start testing it is difficult to determine when to stop testing, as testing is a never ending process and no one can say that any software is 100% tested. Following are the aspects which should be considered to stop the testing:
  • Testing Deadlines.
  • Completion of test case execution.
  • Completion of Functional and code coverage to a certain point.
  • Bug rate falls below a certain level and no high priority bugs are identified.
  • Management decision.

Testing, Quality Assurance and Quality Control

Most people are confused with the concepts and difference between Quality Assurance, Quality Control and Testing. Although they are interrelated and at some level they can be considered as the same activities, but there is indeed a difference between them. Mentioned below are the definitions and differences between them:


S.N.Quality AssuranceQuality ControlTesting
1Activities which ensure the implementation of processes, procedures and standards in context to verification of developed software and intended requirements.Activities which ensure the verification of developed software with respect to documented (or not in some cases) requirements.Activities which ensure the identification of bugs/error/defects in the Software.
2Focuses on processes and procedures rather then conducting actual testing on the system.Focuses on actual testing by executing Software with intend to identify bug/defect through implementation of procedures and process.Focuses on actual testing.
3Process oriented activities.Product oriented activities. Product oriented activities.
4Preventive activities.It is a corrective process.It is a corrective process.
5It is a subset of Software Test Life Cycle (STLC).QC can be considered as the subset of Quality Assurance.Testing is the subset of Quality Control.

Testing and Debugging

Testing:

It involves the identification of bug/error/defect in the software without correcting it. Normally professionals with a Quality Assurance background are involved in the identification of bugs. Testing is performed in the testing phase.

Debugging:

It involves identifying, isolating and fixing the problems/bug. Developers who code the software conduct debugging upon encountering an error in the code. Debugging is the part of White box or Unit Testing. Debugging can be performed in the development phase while conducting Unit Testing or in phases while fixing the reported bugs.

Friday, November 1, 2013

RESTORING AND BACKING UP WINDOWS 98 REGISTRY

0 comments

Backing up the Windows 98 Registry

Windows 98 introduced a new utility known as Scanreg, which automatically makes backups of your Registry each time you boot up your computer.
Tip: The steps listed below for backing up Windows 95 Registry also work but are not necessarily needed unless you wish to keep an original elsewhere.

Restoring Windows 98 Registry

To restore Windows 98 Registry, open a MS-DOS prompt.
At the MS-DOS prompt, type cd\windows\command
Once in this directory, type scanreg /restore this will restore an earlier version of your Registry. Once completed, reboot the computer and this should resolve any issues that may have occurred with your Registry.
If you backed up your Registry using the Windows 95 steps use the Windows 95 restore steps to restore the Registry.

BACKING UP THE WINDOWS 2000 REGISTRY

0 comments
The Microsoft Windows 2000 Registry can be backed up from the backup utility by following the below steps.
  1. Click Start, Programs, Accessories, and click backup.
  2. Within backup, click the backup tab.
  3. Within the backup tab, check "System State", this will create a backup of boot files, COM+ Class Registry Database, and the system Registry.
Restoring the Windows 2000 Registry
If you have created backups using the Microsoft backup utility from the backup utility you can also restore the Registry through this utility.

RESTORING THE WINDOWS 7, VISTA AND XP REGISTRY

0 comments
To restore the system back to an earlier point follow the below steps.
  1. Click Start, Programs, Accessories, System Tools, System Restore
  2. Select the Restore my computer to an earlier time option (as shown in the below picture) and click Next
  3. Select the day and the restore point you wish to restore and click Next.
Windows System Restore

HOW TO USE SYSTEM RESTORE IN WINDOWS XP

0 comments

No matter the cause, you can follow these steps to use System Restore in Windows XP:
  1. Save everything.
    Save all files and close all open programs before System Restore restarts your computer.
  2. From the Start button menu, choose All Programs→Accessories→System Tools→System Restore.
    The main System Restore window is displayed.
  3. Choose the option Restore My Computer to an Earlier Time.
  4. Click the Next button.
  5. Choose a restore point from the cute calendar-like thing.
    The most recent date is chosen by default use it unless you already tried it and experienced problems.
  6. Click the Next button.
  7. Read the warning.
    The text warning is in Red. However, you are, good to go.
  8. Click the Next button.
    It should be named Finish because it’s the last step: System Restore restarts Windows XP.
After you log in again, you need to wait a bit more. Eventually, you see a confirmation message explaining that Windows has been restored. You see a window that details what happened; click OK to close the window.
Restoring the system is also a start-up option. Choose the option Last Known Good Configuration, which is more or less the last system restore point.
You can also perform System Restore in Safe mode. That’s a good choice, especially when the computer is unusable otherwise.

TROUBLESHOOTING MOUSE IN WINDOWS 8

0 comments
Sometimes, the mouse doesn't work at all; other times, the mouse pointer hops across the screen like a flea. Here are a few fixes to try:
  • If no mouse arrow is on the screen after you start Windows, make sure that the mouse's tail is plugged snugly into the computer's USB port. (If you have an older mouse with a round PS/2 port instead of a rectangular USB port, you need to restart your PC to bring the newly plugged-in mouse back to life.)

  •  To restart your PC when the mouse doesn't work, press these keys from either the Start screen or the desktop: Press the Windows key and I key simultaneously to fetch the Charms bar's Settings menu. Then press your keyboard’s arrow keys to highlight the Power button near the bottom of the Settings pane. Press Enter to fetch the Power menu, then tap your Up Arrow key to highlight Restart. Press the Enter key to restart your computer.

  • If you own a cordless mouse, the little guy probably needs new batteries.

  • A mouse pointer can jump around onscreen erratically when the mouse's innards become dirty. Clean the mouse's under parts with a moist rag, making sure to remove any debris.

  • If the mouse was working fine but the buttons seem to be reversed, you've probably changed the right- or left-handed button configuration setting in the Control Panel. Open the desktop Control Panel's Mouse settings area and take a look at the setting for Switch Primary and Secondary Buttons. Lefties want it turned on; righties don't.

HOW TO USE SYSTEM RESTORE IN WINDOWS 8

0 comments
To send your computer back to a restore point when it was working much better, follow these steps:
  1. Right-click the bottom-left corner of any screen and choose System from the pop-up menu. When the System window appears, click System Protection from the left pane. Finally, when the System Properties window appears, click System Restore.
    The System Restore window appears.
  2. Click the Next button at the System Restore window.
    The System Restore Point lists available restore points.
  3. Click a listed restore point.
    You can see more available restore points by selecting the Show More Restore Points check box.
  4. Click the Scan for Affected Programs button to see how your chosen restore point will affect programs.
    A handy touch, this lists programs you’ll probably need to reinstall.
  5. Click Next to confirm your chosen restore point. Then click Finish.
    Your computer grumbles a bit and then restarts, using those earlier settings that (hopefully) worked fine.

HOW TO USE SYSTEM RESTORE IN WINDOWS 7

0 comments
Follow these steps for reverting important Windows 7 system files back to a previous state using System Restore:

  1. Navigate to the Start -> All Programs -> Accessories -> System Tools program group.
  2. Click on the System Restore program icon.
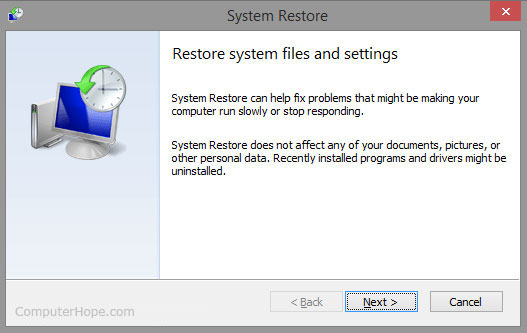
  3. Click Next > on the Restore system files and settings window.
  4. Choose the restore point that you want to use.
    Note: Check the Show more restore points checkbox to see more than the most recent restore points.
    Note: Any restore points that you created, scheduled restore points that Windows 7 created, and those created automatically during the installation of certain programs will be listed here. You can not use System Restore to undo Windows 7 changes to a date that a restore point does not exist.
  5. Click Next >.
  6. Click Finish on the Confirm your restore point window to begin the System Restore.
    Note: Windows 7 will shut down to complete the System Restore so be sure to save any work you might have open in other programs before continuing.
    Important: System Restore will not revert any of your non-system files like documents, email, music, etc. to a previous state. These types files are completely unaffected by System Restore. If your intention with this tool was to recover a deleted non-system file, try using a file recovery program instead of System Restore.
  7. Click Yes to the Once started, System Restore cannot be interrupted. Do you want to continue? dialog box.
  8. System Restore will now restore Windows 7 to the state that was recorded in the restore point you chose in Step 4.
    Note: The System Restore process could take several minutes as you see the "Please wait while your Windows files and settings are being restored" message. Your computer will then reboot as normal when complete.
  9. Immediately after logging in to Windows 7 after the reboot, you should see a message that System Restore completed successfully.
  10. Click Close.
  11. Check to see if whatever Windows 7 problem you were troubleshooting has been corrected by this System Restore.
    If the problem still persists, you can repeat the steps above and choose another restore point if one is available.
    If this restoration caused a problem, you can always undo this particular System Restore.

Thursday, October 31, 2013

Macs And PCs

0 comments

Personal computers come in two main "styles": PC and Mac. Both styles are fully functional, but they do have a different look and feel, and many people prefer one or the other.
A PCA PC
A MacA Mac
  • PC: This type of computer began with the original IBM PC that was introduced in 1981. Other companies began to create similar computers, which were called IBM PC Compatible (often shortened to PC). Today, this is the most common type of personal computer, and it typically includes the Microsoft Windows operating system.
  • Mac: The Macintosh computer was introduced in 1984, and it was the first widely sold personal computer with a Graphical User Interface, or GUI (pronounced gooey). All Macs are made by one company, Apple Inc., and they almost always use the Mac OS X operating system.
Although PC can refer to an IBM PC Compatible, the term can also be used to refer to any personal computer, including Macs.

SPECIALIZED COMPUTERS

0 comments

Today, there lots of everyday devices that are basically specialized computers, even though we don't always think of them as computers. Here are a few common examples:
The iPad, a type of tablet computerThe iPad, a type of tablet computer
  • Tablet Computers: These use a touch-sensitive screen for typing and navigation. Since they don't require a keyboard or mouse, tablet computers are even more portable than laptops. The iPad is an example of a tablet computer.
  • Mobile Phones: Many mobile phones can do a lot of things a computer can do, such as browsing the internet or playing games. These phones are often called smartphones.
  • Game Consoles: A game console is a specialized kind of computer that is used for playing video games. Although they are not as fully-featured as a desktop computer, many newer consoles, such as the Nintendo Wii, allow you to do non-gaming tasks like browsing the internet.
  • TVs: Many TVs now include applications (or apps) that let you access various types of online content. For example, you can view your Facebook news feed or watch streaming movies on Netflix.

SERVERS

0 comments

A server roomA server room
A server is a computer that "serves up" information to other computers on a network. Many businesses have file servers that employees can use to store and share files. A server can look like a regular desktop computer, or it can be much larger.
Servers also play an important role in making the internet work: they are where web pages are stored. When you use your browser to click a link, a web server delivers the page you requested.

LAPTOP COMPUTERS

0 comments

Laptop Computers

A laptop computerA laptop computer
The second type of computer that you may be familiar with is a laptop computer, or laptops as they are often referred to. Laptops are battery or AC-powered personal computers that are more portable than desktop computers, allowing you to use them almost anywhere.
Since a laptop is smaller than a desktop, it's more difficult to access the internal components. That means you may not be able to upgrade them as much as a desktop. However, it's usually possible to add more RAM or a bigger hard drive.

A laptop computer is sometimes called a notebook computer because of its size.

DESKTOP COMPUTERS

0 comments

A desktop computerA desktop computer
Many people use desktop computers at work, home, school, or the library. They can be small, medium, or large in style, and usually sit on a desk. Once you add a monitor, mouse, and a keyboard, you have what is typically known as a desktop computer.

Most desktop computers are easy to upgrade and expand, or add new parts. Another benefit of desktop computers is the cost. If you compare a desktop and a laptop with the same features, you will most likely find that the desktop computer is priced lower.

 Some desktop computers have a built-in monitor to save space. These are often called all-in-one desktop computers.

TIPS AND TRICKS WORD 2010

0 comments
When working in Microsoft Word 2010, don't forget these handy tips and tricks to get something done quickly or to format your text more in a more pleasing way.
  • Press Ctrl+Enter to start a new page. A manual page break is inserted, which forces a new page automatically.
  • Press Shift+Enter to insert a soft return, which is useful for breaking a line of text, such as in a document title or an address.
  • Use tabs to line up your text. Never use spaces. One tab is all you need. If you’re typing more than one tab, you need to reset the tab stops.
  • Always use one tab between columns to line them up. That makes editing the information easier if you have to do it.
  • If you need to change page formatting in the middle of your document, start a new section.
  • Save your styles in a template! That way, you can use them for new documents you create without having to rebuild all your styles over and over.

MS OFFICE 2010 SIMPLIFIED

0 comments


Start and Exit

Office Applications


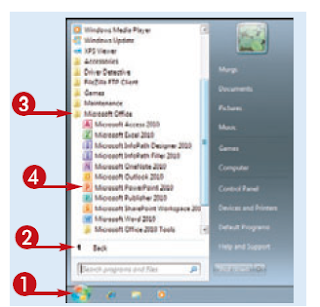
Before you can begin working with a Microsoft Office application, also called a program, you (You learn how to create a shortcut icon for a must open the application. program in the tip at the end of this section.)When you finish your work, you can close the

One is to launch it from the Start menu, as There are a few ways to start an application. program. If applicable, you can save your work described in this task. Another is to double-click before exiting a program completely.the program’s shortcut icon on the desktop.


Start and Exit Office Applications

Start an Office Application


1 Click Start.

2 Click All Programs . The All

Programs menu option changes to a Back menu


3 Click Microsoft Office .

4 Click the name of the program

that you want to open.


• The program that you selected

opens in a new window.


Note: See the next section to areas of the program window.learn how to identify different

HOW TO EXIT AN OFFICE WINDOW

0 comments


You can close an office application by following these simple steps.

STEP ONE.
Click the close button on the top right corner of the office application.
You can also close the application by Clicking on File Tab then clicking on exit button.
If you have not yet saved your work, then program prompts you to do so before exiting.
Click Save.
The program window closes.

STEP TWO
If you click Don’t Save, the program closes without saving your data.
If you click Cancel, the program window remains open.
Check image below for further help.

If u think this post is helpful please don’t forget to comment below.

MS OFFICE 2010 NAVIGATE THE PROGRAM WINDOW

0 comments
Navigate the
Program Windows
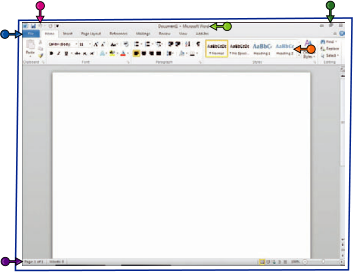
All Office programs share a common appearance and many of the same features.     bars, which you can use to navigate an open  These features include a Ribbon, which appears   file in a program window. When you learn how instead of the menus and toolbars found in     the same skills to navigate the others. If you to navigate one Office program, you can use previous versions of Microsoft Office; a Quick    are new to Office, you should take a moment  Launch toolbar, which features a customizable    to familiarize yourself with the suite’s various set of frequently used commands; and scroll     on-screen elements.
Title Bar
open file and the Office Displays the name of the
program.
Quick Access
Toolbar
buttons to the Save, Displays quick access  Undo, and Redo  commands.
File Tab Menu


Click to display a menu of file commands, such as New and Open.

Ribbon             Status Bar
commands in tabs. Each tab Displays groups of related
offers buttons for performing common tasks.
Displays information about the current worksheet or file.
Program Window Controls Use these buttons to minimize window to full size, or close the the program window, restore the window.

BASIC OFFICE 2010

0 comments
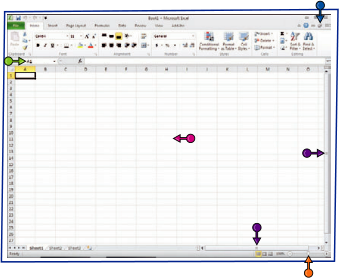
Formula Bar
This appears only in Excel. Use this bar to type and edit formulas on your worksheet data.and perform calculations
Work Area
The area where you add and work with data in a the Office program, the program. Depending on work area may be a document, a worksheet, or a slide.
Document Window
Controls
Use these buttons to minimize or restore the current document within the program window.


Zoom Controls      Scroll Bars
Use this feature to zoom your view of a document.
Use the vertical and horizontal scroll bars to scroll through the item shown in the work area, such as a document or worksheet.


Work with the Ribbon
Instead of the menus and toolbars found in earlier versions of Office, Office 2010 features locate and execute commands.the Ribbon, which offers an intuitive way to
setting text alignment, indenting text, and so
as when you are working with a table or picture on. Some tabs appear only when needed, such in a document.
The Ribbon is grouped into tabs, each example, the Home tab in Microsoft Word containing groups of related commands. For contains commands for changing the font,
The Ribbon is maximized by default, but you window.can minimize it to view more of your program
Work with the Ribbon
Use the Ribbon
1  Click a tab.
The tab organizes related tasks and commands into logical groups.
2  Click a button to activate a command or feature.
  Buttons with arrows display
additional commands.
  With some groups of
commands, you can click the
display a dialog box of corner group button ( ) to additional settings.
When you position the mouse
pointer over Live Preview options on the Ribbon, you
8  see the results in the document before applying the command.

Monday, October 28, 2013

HOW TO TURN OFF AND RESTART COMPUTER IN WINDOWS XP

0 comments

Turn Off and Restart the Computer

When you've finished using Windows XP, be sure to turn off (or shut down) the computer correctly.
To turn off the computer:
  1. Click the Start menu.
  2. Click Turn Off Computer.
  3. A dialog box opens. Click Turn Off.
Turn Off Computer dialog box
If you're experiencing computer problems or have installed something new, you can simply restart your computer.
To restart the computer:
  1. Click the Start menu.
  2. Click Turn Off Computer.
  3. A dialog box opens. Click Restart.
It's generally safest tor turn off or restart your computer using the methods above. However, many computers are designed to safely shut down when the power button is pressed. You should consult your manual to see the recommended shutdown procedure.

WINDOWS XP START MENU

0 comments

The Start Menu

To begin exploring Windows XP, click the Start button.
Start button
When you click the Start button, the Start menu appears. The Start menu is your gateway to the applications that are on your computer. The left side of the Start menu lists programs, and the right side allows access to common Windows folders (My Documents, for example). It also provides access to Help and Support, Search, and Run.
Start menu
If you select All Programs, a pop-up menu appears. Pop-up menus like this are called cascading menus. If a cascading menu is available, a small black triangle appears next to the name of the application or function.
In the example below, the Word program has been selected.
Starting Word via the Start menu
To explore the Start menu:
  1. Click the Start button.
  2. Move the mouse pointer to each option, and view the various cascading menus.
  3. Click (or roll your mouse pointer over) All Programs.
  4. Move the mouse pointer to the right and view other cascading menus.
  5. To exit the menus, click outside the menu area or press Esc on your keyboard.
The Start menu remembers items you've recently opened and places the icon on the Start menu so you can easily open it next time you open the Start menu. For example, if you recently opened Microsoft Word using StartAll ProgramsMicrosoft Word, the next time you open the Start menu, simply click the Word icon on the left side of the Start menu.